Google Cloud Observability
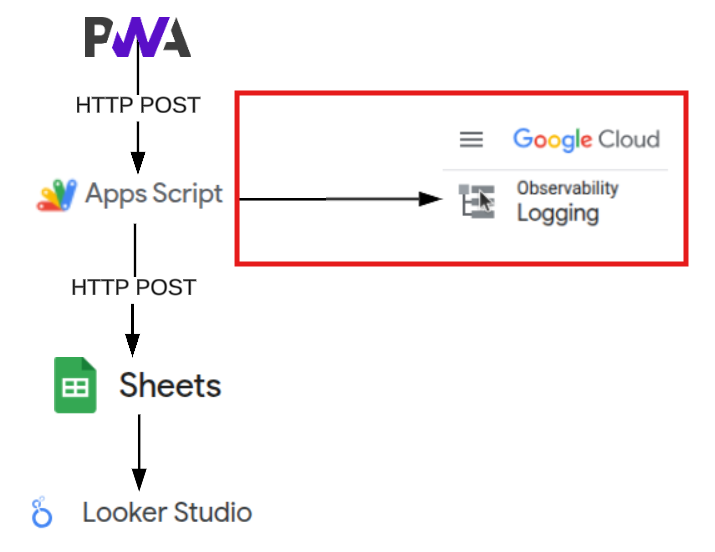
This tutorial guides you through setting up Google Cloud Logging for your Apps Script project which will enable centralized logging and monitoring for better debugging and observability.
This level of observability is not necessary for this project, and is only an optional addition.
Prerequisites
- Google Cloud Platform account with billing enabled
- Apps Script project (built in tutorial 3)
- Basic understanding of JavaScript and Google Cloud concepts
⚠️ To make use of google observability, you must enable billing against your google account. As of August 2025, it is not predicted that the level of use for a basic personal project of this nature will incur costs. The free tier allows up to 50GB and includes up to 30 days of log data retention - more details about google cloud billing can be found at google log pricing
Step 1: Create a Google Cloud Service Account
1.1 Enable Required APIs
- Go to the Google Cloud Console
- Select or create your project
- Navigate to APIs & Services > Library
- Search for and enable:
- Cloud Logging API
1.2 Create Service Account
- Go back to the Google Cloud Console
- Navigate to IAM & Admin > Service Accounts
- Select Service Accounts from the left hand pane
- Click Create Service Account
- Fill in the details:
- Service account name: scripting-logger
- Service account ID: scripting-logger (auto-generated)
- Description: Service account for Apps Script logging integration
- Click Create and Continue
1.3 Assign Permissions
Add the following roles to your service account:
- Logs Writer (roles/logging.logWriter)
- Monitoring Metric Writer (roles/monitoring.metricWriter) (optional, for metrics)
1.4 Generate Private Key
- Click on your newly created service account
- Go to the Keys tab
- Click Add Key > Create new key
- Select JSON format
- Download the JSON file securely
⚠️ Security Note: Never commit this JSON file to version control. Store it securely in your password/key manager.
Step 2: Configure Apps Script with the logger Properties
2.1 Extract Service Account Details
From your downloaded JSON file, extract:
private_keyclient_emailproject_idclient_id
⚠️ Make sure you copy the entire key including —–BEGIN PRIVATE KEY—– header, and —–END PRIVATE KEY—– footer
2.2 Set Script Properties
In your Apps Script editor:
- Go to Project Settings (gear icon)
- Scroll to Script Properties
- Add the following properties:
// Set these as Script Properties in the Apps Script editor
PRIVATE_KEY: "-----BEGIN PRIVATE KEY-----\nYourActualPrivateKeyHere\n-----END PRIVATE KEY-----",
SERVICE_ACCOUNT_EMAIL: "scripting-logger@your-project-id.iam.gserviceaccount.com",
PROJECT_ID: "your-project-id",
CLIENT_ID: "your-client-id"
Alternative method using code:
Create a function to set the properties and run it
function setupProperties() {
  const properties = PropertiesService.getScriptProperties();

  // Replace with your actual values from the JSON file
  properties.setProperties({
    'PRIVATE_KEY': '-----BEGIN PRIVATE KEY-----\nYour-Private-Key-Here\n-----END PRIVATE KEY-----',
    'SERVICE_ACCOUNT_EMAIL': 'scripting-logger@your-project-id.iam.gserviceaccount.com',
    'PROJECT_ID': 'your-project-id',
    'CLIENT_ID': 'your-client-id'
  });

  Logger.log('Properties set successfully');
}
Once you have run the function - remove it.
⚠️ Security Note: If you are extending this application beyond personal use, adjust to Google Secrets Manager for safer key management within the app
Step 3: Install OAuth2 Library to Apps Script
In Apps Script editor, click Libraries (+ icon in left sidebar)
- Add the OAuth2 library:
- Script ID: 1B7FSrk5Zi6L1rSxxTDgDEUsPzlukDsi4KGuTMorsTQHhGBzBkMun4iDF
- Version: Select the latest version
- Identifier: OAuth2
- Click Save
Step 4: Implement Cloud Logging Functions
In Google Apps Script, edit the script that was created in the previous tutorial.
4.1 Add Constants
// Configuration constants
const SERVICE_ACCOUNT_EMAIL = PropertiesService.getScriptProperties().getProperty('SERVICE_ACCOUNT_EMAIL');
const PROJECT_ID = PropertiesService.getScriptProperties().getProperty('PROJECT_ID');
const CLIENT_ID = PropertiesService.getScriptProperties().getProperty('CLIENT_ID');
const PRIVATE_KEY = PropertiesService.getScriptProperties().getProperty('PRIVATE_KEY');
const DEBUG_LOGGING = false; // Set to true when debugging

// Validate required properties
if (!SERVICE_ACCOUNT_EMAIL || !PROJECT_ID || !PRIVATE_KEY) {
  throw new Error('Missing required service account properties. Please check your Script Properties.');
}
4.2 Setup OAuth2 Service
/**
 * Initialize OAuth2 Service for Google Cloud Logging
 * @return {OAuth2Service} Configured OAuth2 service
 */
function getOAuthService() {
  const service = OAuth2.createService('CloudLogging')
    .setTokenUrl('https://oauth2.googleapis.com/token')
    .setPrivateKey(PRIVATE_KEY)
    .setClientId(CLIENT_ID)
    .setIssuer(SERVICE_ACCOUNT_EMAIL)
    .setPropertyStore(PropertiesService.getScriptProperties())
    .setScope('https://www.googleapis.com/auth/logging.write');

  return service;
}

/**
 * Reset OAuth2 service (useful for debugging)
 */
function resetOAuthService() {
  const service = getOAuthService();
  service.reset();
  Logger.log('OAuth service reset');
}
4.3 Add a Core Logging Function
/**
 * Send logs to Google Cloud Logging
 * @param {string} message - Log message
 * @param {string} severity - Log severity (DEFAULT, DEBUG, INFO, NOTICE, WARNING, ERROR, CRITICAL)
 * @param {string} logName - Custom log name (optional)
 * @param {Object} jsonPayload - Structured data (optional)
 */
function sendLog(message, severity = 'INFO', logName = 'apps-script-log', jsonPayload = null) {
  // Validate inputs
  if (!message) {
    throw new Error('Log message is required');
  }

  if (!PRIVATE_KEY) {
    throw new Error('PRIVATE_KEY not found in Script Properties');
  }

  // Get OAuth2 service
  const service = getOAuthService();
  if (!service.hasAccess()) {
    throw new Error('OAuth service authentication failed. Check service account configuration.');
  }

  // Construct log entry
  const logEntry = {
    logName: `projects/${PROJECT_ID}/logs/${logName}`,
    resource: {
      type: 'global'
    },
    entries: [{
      severity: severity,
      timestamp: new Date().toISOString(),
      ...(jsonPayload ? { jsonPayload } : { textPayload: message })
    }]
  };

  // API request options
  const options = {
    method: 'POST',
    contentType: 'application/json',
    headers: {
      'Authorization': `Bearer ${service.getAccessToken()}`
    },
    payload: JSON.stringify(logEntry)
  };

  // Send request
  try {
    const response = UrlFetchApp.fetch('https://logging.googleapis.com/v2/entries:write', options);

    return {
      success: true,
      response: response.getContentText()
    };
  } catch (error) {
    const errorMessage = `Failed to send log: ${error.toString()}`;
    Logger.log(errorMessage);
    throw new Error(errorMessage);
  }
}
4.4 Add Convenience Logging Functions
/**
 * Log info message
 */
function logInfo(message, data = null) {
  return sendLog(message, 'INFO', 'apps-script-info', data);
}

/**
 * Log error message
 */
function logError(message, error = null) {
  const errorData = error ? {
    message: message,
    error: error.toString(),
    stack: error.stack
  } : null;

  return sendLog(message, 'ERROR', 'apps-script-errors', errorData);
}

/**
 * Log warning message
 */
function logWarning(message, data = null) {
  return sendLog(message, 'WARNING', 'apps-script-warnings', data);
}

/**
 * Log debug message (only when DEBUG_LOGGING is true)
 */
function logDebug(message, data = null) {
  if (DEBUG_LOGGING) {
    return sendLog(message, 'DEBUG', 'apps-script-debug', data);
  }
}
Step 5: Usage Examples
5.1 Basic Logging
The easiest usage will include a few simple log lines in the doPost method (created during previous tutorial).
This will be sufficient logging for a personal project.
⚠️ Best Practice Note: If you were to extend this project beyond personal use, consider updating to structured logging (for example: introduce correlation id’s, include payload headers, etc).
function doPost(e) {
  try {
    logInfo('Function started', { functionName: 'doPost', timestamp: new Date() });
    const data = JSON.parse(e.postData.contents);

    validateData(data);

    // Process and store data
    const result = logTimeEntry(data);

    if (result) {
     logInfo('Updated Spreadsheet Successfully', { result: result });
     // Return with CORS headers for downstream apps
     if (result) {
       return ContentService
       .createTextOutput(JSON.stringify({success: true, id: result}))
       .setMimeType(ContentService.MimeType.JSON)
       .setHeaders({
         'Access-Control-Allow-Origin': '*',
         'Access-Control-Allow-Methods': 'POST',
         'Access-Control-Allow-Headers': 'Content-Type'
       });
    }

    logError('Function doPost failed');
    logDebug('debug data:', data); // Set DEBUG to true and run with that flag on, if you need to inspect the data/payload
    throw new Error("No result from logTimeEntry");

  } catch (error) {
    logError('Function doPost failed', error);
    logDebug('debug data:', data); // Set DEBUG to true and run with that flag on, if you need to inspect the data/payload
    // Return with CORS headers for downstream apps
    return ContentService
      .createTextOutput(JSON.stringify({error: "Processing failed"}))
      .setMimeType(ContentService.MimeType.JSON)
      .setHeaders({
        'Access-Control-Allow-Origin': '*',
        'Access-Control-Allow-Methods': 'POST',
        'Access-Control-Allow-Headers': 'Content-Type'
      });
  }
}
Step 6: View Logs in Google Cloud Console
- Go to the Google Cloud Console
- Navigate to Logging > Logs Explorer
- Use the query builder or enter queries like:
resource.type="global"
logName="projects/YOUR-PROJECT-ID/logs/apps-script-info"
- Set appropriate time ranges and filters
Best Practices
When adding observability logs, you should always try to keep in-line with best practices:
- Do not hardcode private keys directly into your script
- Use Script Properties or Google Secrets Manager for sensitive data
- Regularly rotate service account keys
- Follow the principle of least privilege for IAM roles
- Use appropriate log levels (DEBUG, INFO, WARNING, ERROR)
- Use structured logging with correlation id’s when extending the system